Saturday, December 11, 2010

Japanese Dinner


A couple of weeks ago we decided to make sushi and gyoza at home, and have a Japanese themed dinner.  Normally, we do theme dinners, but we never ever had done a Japanese theme....mainly because I think that the thought of making sushi at home is a bit daunting!  It looks quite simple, but I know that it is the perfect balance of the rice, extra fresh fish and technique.  But we gave it a go, and it was actually quite fun!  My friend Cris prepared the rice, and she did a fantastic job.  I made the gyoza and the rolls and then the toro tuna tataki. 
I was pretty scared about the sushi, just because I have never made it in my life.  But I have eaten hundreds of times at my favorite sushi bar here in Barcelona, and have studied the sushi chefs closely.  So I put all of those memories to practice.  I remembered the part about keeping your fingers moist  so the rice won't stick to your fingers, and to press it down evenly in a semi-thin layer.  The cutting of the fish was what made me nervous.  I remember watching them slice it perfectly, discarding any bits that weren' t perfect.  But we bought our salmon form sushi restaurant purveyors in the market by my house, so freshness was guaranteed.  The actual rolling bit takes a couple of tries, but once I got the hang of it, I managed to make quite a few rolls that looked *close* to perfect!  I guess I will have to try it more than once a year to actually get the hang of it.  But, honestly, I much prefer to sit at my favorite place and watch them make it!

Here's the recipe for the gyoza, that turned out to be delicious and it is really easy.

For 20 gyoza approx:

1 package of wonton wrappers
1/2 lb ground pork or beef of a mix of both
3 scallions, chopped
1/3 cup boiled napa or chinese cabbage, sliced
3 tbsp soy sauce
1 tbsp fresh grated ginger
1 tbsp oil

For Serving Sauce
2 tbsp rice wine vinegar
1 tbsp soy sauce
Chili oil to taste

Mix all ingredients except oil in a large bowl.  Place 1/2 tbsp of filling in wonton wrapper, and with wet fingers press together to seal.  When done, heat oil over high heat in a non-stick skillet.  Place the gyoza flat side down, and brown for about 2-3 minutes.  Lower the heat to medium low, and add 1/4 cup of water and cover the skillet and steam until all the water has evaporated.
Serve with the sauce and your favorite Sake.......Kampai!!!

Thursday, December 9, 2010

Fish Vizcaina Style

As our shadows get longer, and afternoons lazier, I only want to eat oven baked things or stews. Probably its because I am from Miami, and for me, even if it is 19 degrees outside, I am free-zing. As a child, we lived on an island. Even so, we really didn't eat much fish. My journey into the discovery of all things aquatic began here, in Barcelona. I never realized the amount of edible things that come out of the sea, or the enormous variety of fish. As an American, my staples were Tuna, Swordfish, Salmon, Grouper (because of my island life) Tilapia, Trout.....all very basic, and very boring. The fish aren't boring, don't get me wrong, just sticking to these types of fish is. Especially now, that we are so conscious of what we eat and if we are depleting our oceans, those type of fish are the ones that suffer the most, and I am wholly against farm raised fish. That is the good thing about Spain. We eat a large variety of fish, and the market where I go to, most of them are line caught. Mine even still had the hook in its mouth when we bought it. I love fish. It is so flavourful, so easy to cook, and ridiculously healthy. Recently I have become obsessed with fish prepared a la Vizcaina. This is a Basque preparation of fish, right before serving, they top it with a garlic-chili vinaigrette. You can do it with most fish, but I do think they can't be as strong tasting as salmon or tuna. Today we prepared Large Scale Scorpion Fish. It is similar to scorpion fish, but with bigger eyes and smaller fins. It was really different. I would say it is extremely similar in taste and texture to monkfish, so if you can find it at your local fishmonger, its a safe alternative to monkfish, which are on the endangered list.


Here is an easy recipe that is sooooo delicious. The best part is that it doesn't take long, so if you are having guests for dinner you can pop it into the oven when they get there and sit and chat with them for a while.


For 4


Two 1/2 lb large scale scorpion fish, gutted and scaled

1 large red pepper, chopped

6 shallots, cut in half

6 garlic cloves, cut in half

8 small potatoes, sliced crosswise

1 sprig of thyme, leaves separated from the stem

salt and pepper to taste

1/2 cup olive oil


Vizcaina Sauce

1 tsp chili flakes

1 garlic clove, peeled and whole

1/8 cup olive oil

2 tbsp sherry vinegar

1 tbsp extra virgin olive oil


Preheat the oven to 400 deg. In a large baking dish, place the red pepper, shallots, garlic and potatoes. Top with 1/4 cup of the olive oil, salt, pepper, and cover with foil and set in the oven. Cook for 20 minutes.

In the meantime, wash and dry your fish. Salt and pepper it on both sides, and then sprinkle your thyme leaves.

Lower the oven to 375 deg, and take out your pan with the veggies. Place the fish directly on top, add the remaining 1/4 cup olive oil and cover with foil again. Cook for about 15 minutes, and then uncover for the last 15.

In the meantime make the Vizcaina sauce. In a small saucepan, place your olive oil (not the extra virgin) chili flakes and garlic. Over low heat, swirl your saucepan and cook it gently for about 5-8 minutes. If you notice that your garlic is starting to burn, take the saucepan off the heat, continuing to swirl. When it is really fragrant, add the extra virgin olive oil and the vinegar, take off the heat and continue to swirl to emulsify the sauce.

When your fish is done, fillet the pieces on to a plate, add your veggies and spoon the sauce over the fish. Open up a bottle of Albarino, or another full bodied white.


I am positive you are going to love it.....Enjoy!!!

Friday, December 3, 2010

Mediterranean Connection : Fusili with smoked aubergine and tomato sauce

As you all know, I recently returned from Istanbul.  One of my favorite favorite mezze was the smoked aubergine dip.  I was racking my brain how I could possibly recreate it back here at home, then flipping through my cookbook, it showed the process.  I had no idea it was this easy....you can smoke it on top of your gas flame or on the barbecue! 
Needless to say, I don' t have a barbecue, but I do have a gas stove top.  I already made the dip on its own, but since I am so in love with it, I wondered if it could be recreated into a pasta dish.  Since all the ingredients I am going to use are Mediterranean, both common in Italy and Turkey, I figured, why not?

So, I bought my firm, medium, unblemished aubergine and dutifully smoked it.  Combined it with a spicy tomato sauce that I had leftover from pizza night on Monday (Barca vs. Madrid game....5-0!!!) and toasted up some pine nuts, chopped some fresh parsley and mozzarella. 

It was amazing.  I really wasn't sure what the flavours would taste like together, but the smoked aubergine gave the spicy tomato sauce a rich meaty flavour!  The best part is that its really easy to make, healthy and light! 

250 g Fusili pasta

For the tomato sauce:

1 small can crushed tomatoes
1 Tbsp olive oil
2 garlic cloves, peeled and sliced in half
1 tsp crushed red chillies
1/2 tsp oregano

1 medium aubergine
2 tbs pine nuts, toasted
1 mozzarella, cubed
1 tsp fresh parsley
Salt and Pepper to taste

Put a large stock pot of water to boil.  In the meantime place the olive oil in a small sauce pan over low heat.  Add the garlic, chillies, and oregano.  Heat until fragrant, about 2 minutes.  Add the crushed tomatoes and simmer for 10-15 minutes.


Over a gas flame set on medium, place entire aubergine.  Keep turning until you touch the aubergine and its soft, but not mushy.  Place in a plastic bag and let it sweat for 5 minutes.  Over a bowl, cut aubergine in half and scoop out the flesh and mush with a fork.  Set aside. 


Toast your pine nuts, until dark golden, swirling but don't let them burn.  When the water is boiling, add your pasta and boil as it says on the package instructions.  When the pasta is done, drain and mix it with the sauce, aubergine, pine nuts and mozzarella.  Mix well, and top with the fresh parsley, salt and pepper to tase.  Have a glass of red wine, and your done!  Enjoy! 

Wednesday, December 1, 2010

My birthday/Thanksgiving dinner

This year, my birthday/Thanksgiving dinner seemed like it was going to be an absolute disaster.  On Thursday, when I was buying all the vegetables I suddenly started feeling....not so well.  So I took some vitamin C, and did some salt water gargles and prayed for the best.  Friday morning.....oh the horror.  I felt like a bobcat had climbed into my bed while I was sleeping and gashed at my throat over and over again.  But, knowing that I had 20 guests coming over for dinner and about 30kg of vegetables strewn all over my kitchen made me get up, and go pick up my turkeys.  Disaster number two struck.....my turkey lady confused my 2 fourteen pound turkeys for 2 twenty pound turkeys and said she didn't have anymore and she was sorry.  So I went back home, only to spend half of my birthday morning plucking the remaining feathers from the monstrous beasts only to then realize that 1) I had to make more brine for them then 2) they didn't fit in my oven.  So, I did what any normal person in this type of situation would do.  I slumped down on the kitchen floor and cried.  Just a little bit.  Then I had a beer.  My boyfriend came home and found this burbling idiot and did what a smart person would do in this situation.  He called the turkey lady and gave her a piece of his mind.  Then, ta da! Just like magic, she DID have two 14 lb turkeys that just happened to appear after he spoke to her.  Anyhow, so all seemed to be going well, except that then the 3rd disaster struck.  They didn't fit in the fridge.  So, got a large plastic organizer container (with wheels, thank God) and placed the brine and the turkeys in there, sealed it with its lid and had to put the suckers on the balcony.  Its about 10 degrees outside so I thought they would be ok.  Except for that night, we had a cold spell and I was hoping and praying that I didn't wake up to two frozen turkeys.  Alas, they were fine, and I was able to pull off my whole meal in relative calm (read : in my pj's, overdosing on paracetamol, and taking naps any minute I could).

So this is my turkey day extravaganza menu, and I will share what I think is one of the knockout recipes with you!

THANKSGIVING 2010 MENU

APPETIZERS

Sausage and Potato Puffs
Truffled Brie with a Warm Wild Mushroom Fricassee

MAINS + SIDES

2 Riesling and spice brined Organic Turkeys
Asturian Cider Gravy
Apple, Leek, and Bacon Stuffing
Mini Corn Bread Puddings
Green bean Casserole, updated with porcini instead of button mushrooms
Sweet Potato and Potato Gratin

DESSERTS

Chocolate and Bourbon Tart
Apple Pie

Sausage and Potato Puffs Recipe: Sorry...no picture cause they flew before I got out the camera!!!!

4 dozen puffs

30 mins active, total time 1hr

3/4 lb potatoes
1 lb sausage ( I used a mix of chorizo, morcilla (black pudding) spicy italian and regular) casings removed
3/4 cups water
6 tbsp unsalted butter
1 1/2 tsp of salt
3/4 cup flour
4 large eggs
1/2 cup shredded Gruyere
1/4 cup grated Parmesan
1 tsp chopped thyme
1/2 tsp chopped rosemary
freshly ground pepper
1 lg egg yolk mixed with a tbsp of water

1. Preheat oven to 425 deg.  Coat mini muffin pan with oil spray.  In saucepan, simmer potatoes for 20 mins, or until tender.  Let cool and peel and mash coarsely.

2. In a medium skillet, cook sausages until browned, 8 mins, coarsely crumble

3. In a medium saucepan, bring water, butter and salt to a boil.  Remove from heat and add flour, stirring vigorously with a wooden spoon, until combined.  Set over medium heat and cook dough, stirring until it comes away from the sides of the pan, 2-3 minutes.  Remove from heat.

4. Using and electric mixer, beat dough for 1 minute on low speed.  Beat in eggs, one at a time on medium speed.  Beat in Gruyere, Parmesan, herbs and pepper.  Stir in potatoes and sausage.

5. Fill muffin cups with dough, and brush the tops with the egg mixture.  Bake for 20 minutes until puffed up and golden.

Tuesday, November 23, 2010

Anatolian flat breads with spinach: Gozleme

I'm back!  Yes, I have been off for a long time, was going through  a bit of food block...and also an injury to my ankle in Sept prevented me from standing for long periods of time.  But, the most important thing, is that I have my creative juices flowing thanks to an amazing weekend full of food and fun in Istanbul.

I love Istanbul, I love the people, the city, the breathtaking views from the Bosphorus, but I never really got into its food as much as this last trip, thanks to my friend Hulya who is a native and knows exactly where to take me.  This past weekend I had mezze (tapas like dishes) almost everyday.  I now have a new found admiration for Turkish food.  Growing up eating Syrian dishes most of my life, I never really paid attention to the details of Turkish gastronomy, always thinking it was similar.  Similar it is, but it is also uniquely their own.  I have fallen in love with the simplicity of their dishes, the complexity of the flavours, and the incredible variety and freshness of all the vegetables and fish. 

So, I returned last night, still craving mezze.  And today, I woke up, craving more.  Last night I made this amazing smoked eggplant, but today I thought I would tackle what looked like a harder recipe from my new cookbook.  I am amazed at how easy it was to make.  And quick!  And healthy!  And of course, delicious!  Need I say more?  Well, here it is, the recipe for Gozleme with spinach.  Oh, it also helped that I came back with a huge selection of spices! 

Serves 2-4

115g/1 cup strong unbleached bread flour, plus extra for dusting
2.5 ml/  1/2 tsp salt
15ml/ 1 tbsp olive oil, melted butter or ghee
50ml/ 1/4 cup water, plus more if needed

For the filling
250g/ 9 oz. fresh spinach
15g/ 1 tbsp butter
1 onion, chopped
pinch of freshly grated nutmeg
5ml/ 1 tsp kirmizi biber, or chili flakes or paprika
7.5ml/ 1 1/2 tsp all purpose flour
120ml/ 1/2 cup milk
45ml/ 3 tbsp kasar paynir or parmesan cheese, grated
salt and ground black pepper

1. Sift the flour with the salt into a bowl.  Make a well in the center and pour in the oil, or melted butter or ghee, and the water.  Using your hand, draw in the mixture into a dough.  Knead for about 5-7 minutes.

2. Divide the dough into 4 pieces, knead them for another 2 minutes each and then roll into balls.  Place the balls on a floured surface, cover with a damp cloth, and leave them to rest for 30 minutes.


3. Meanwhile, prepare the filling.  Place the spinach in a steamer, or in a colander set in a large pan with a lid, and steam the spinach until it wilts.

4. Refresh the spinach under running cold water and drain well.  Place the cooked spinach on a chopping board and chop roughly.

5. Melt the butter in a heavy saucepan, and soften the onion, about 7 minutes.  Stir in the spinach, and add the nutmeg and kirmizi biber (or other options).

6. Stir in the flour and pour in the milk, stirring constantly until thickened. Beat in the cheese and season with salt and pepper.  Turn off heat, but keep the pan covered to keep the filling warm.

7. On a lightly floured surface, roll out each of the balls of dough into thin, flat rounds, about 15-20 cm/6-8 inches in diameter.

8. Heat a griddle over high heat, wipe it with a little olive oil, and place one of the rounds of dough on to it.  Cook the dough for about a minute on one side, then flip it over and spread a thin layer of the filling over the cooked side.


9.  Cook the second side for 1-2 minutes, allowing it to buckle and brown, then lift it off the griddle and place it on a plate or baking parchment., and roll it up!  Voila, you're done!  Enjoy!


Sunday, September 19, 2010

Pesto Genovese


Yes, I am on an Italian kick.  Maybe its the fact that I miss living so close to Italy, maybe its the fact that one of my best friends is moving back to our school town.  Most probably its that I can get my daughter to eat anything that is Italian, and my boyfriend is Italian.
I find that making Italian food is a joy.  Not only are most of the recipes super simple, they are also gorgeous.  Pesto is a sauce that is always an after thought for me.  I usually make it out of necessity, because I bought basil and used one leaf and then I have a bunch that usually goes bad.  When it does, I kick myself and think, why didn't I make pesto?  Its not as if it is going to take me a long time to make it, heck, what couldn't be easier?  There is no cooking involved, and if you know the basics it can really be done with out measuring.  And, it is also DELICIOUS. 

This time I bought the basil apropos, and made the sauce.  It is going to be autumn soon, and with the cool weather come wild mushrooms, and bye bye basil.  So here is my last hurrah for summer....gorgeous green basil Peso alla Genovese!  The key to this recipe is that all the ingredients be of the best quality.  Buy the freshest greenest unblemished basil you can find, some quality pine nuts and olive oil, fresh garlic (not the pre-chopped variety) and the star, Parmiggiano Reggiano.  Please don't purchase Parmesan cheese substitutes, not only does that taste and smell of feet, it isn't worth your money.  A small piece of real Parmesan cheese goes a long way if you keep it wrapped properly in your fridge, and is also great for snacking. (Low fat and highest percentage of calcium in any cheese).  So, here is my recipe, the measurements are pretty crude because I go by my uncle's recipe, but it should turn out pretty amazing!

2 medium bunches fresh basil leaves
1/2 cup good quality Italian or Spanish extra virgin olive oil
1 handful of pine nuts, toasted
3 small garlic cloves, coarsely chopped
Salt and Pepper to taste
About 1 cup grated Parmiggiano Reggiano


1. Pick the nicest, unblemished leaves of basil off the stems.  DO NOT WASH!!!  Clean then with a paper towel, if  you wash them they will lose their fragrance and flavor. 
2. Toast your pine nuts, you can do this in a pan over low heat, making sure they go just golden, not dark brown.  This releases their aroma and taste.  Set aside. 


3. In the cup of an immersion blender or food processor (or mortar, if you really want to be true to the recipe) place your olive oil, pine nuts, garlic and basil leaves.  Pulse until mixed completely and there are no large pieces of pine nuts or garlic, and it turns to a lovely green color.  Add your salt and pepper to taste, but make sure you don't add too much salt, because Parmesan cheese is salty already.   Mix in the cheese if you are using it immediately.  If you are going to keep it in the fridge, make sure there is a bit of olive oil on the top of the mix, that way your leaves won't oxidize and turn black, and mix in cheese right before serving, that way it will keep for 3 days.
4. Boil pasta according to package directions, al dente please.  Strain your pasta, and mix in the pesto and serve.  You can garnish with some more fresh pepper and salt and  more cheese, if you wish.
Buon Appetito!

Wednesday, September 15, 2010

Ragu alla Bolognese


There are a lot of recipes for Bolognese sauce out there, and as I have commented in my blogs before, everybody, especially Italian households, have their own version.  But recently, I was told that Bologna has published the "original" version of their world famous sauce.  I was really really happy to see that mine is quite close to the original....but like all every one else, I have my own tweaked version of it. 

It really isn't as laborious as it sounds, once you have it on the stove, you can basically leave it (but just make sure it doesn't burn).  Since this is my daughter's favorite sauce, I will happily relinquish my recipe.  If you have any left over, obviously this is what you can use to make meat lasagna. 

I generally prefer it with spinach tagliatelle, or pappardelle.  I am not a huge fan of spaghetti.....I kind of have to crave spaghetti.  But nothing reminds me more of my youth in Lugano than a plate of "Cicche del Nonno con ragu bolognese".  Cicche del nonno (grandpa's cigars) are ricotta and spinach gnocchi, which is a dish I haven't yet mastered.....but I also think I haven't tried it out since I remember it so fondly, and I also tend to think that food tastes so much better when someone else prepares it.   Maybe my next post will be to try and recreate my childhood favorite....let's see.  But in the meantime, here is my recipe for Ragu alla Bolognese.  Pour yourself a glass of the wine you are using, put on some music (Radiohead or The Killers is always a great option) and enjoy the process,  Alla tua salute!

1/4 cup olive oil
2 slices of guanciale or pancetta, finely diced (if you can't get either, you can use bacon as a last resort.)
1 large onion, finely diced
1 large carrot, grated
1 large stalk of celery, finely diced
1 lb ground beef or pork ( I like to use a mix of both)
1 cup white wine (in winter I like to use red)
1 cup beef stock
1 tbsp salt
3 cups pureed tomatoes (canned or fresh from Roma or pear tomatoes)
Pepper to taste

1.In a large stockpot with a heavy bottom, fry up your guanciale or pancetta until it is golden brown over medium high heat.


2.Lower the heat to low, and add your onion, celery and carrot.  Saute, covered for 10-15 minutes.

3. Uncover and raise heat to high, and add your meat and brown.  When the meat is no longer pink, add your wine and let it evaporate completely. 


4.When the wine is all evaporated, add your salt, stock and pureed tomatoes and let it come to a boil.
 Let it boil for 10 minutes uncovered, then lower the heat to medium low,  and let it simmer with the top half off for about 2 hours, or until it is thick and glossy and all of the water from the tomatoes is evaporated.  Add  the fresh ground pepper.  You can serve it immediately, but it is always better after it has rested overnight. 

Wednesday, September 1, 2010

Casatiello

14:27 pm, my house, Barcelona.
Nothing makes your house feel like a home like freshly baked bread.  The only thing is.....I don't have a bread maker and rarely think about making bread.  But the thought of my house smelling like a Boulangerie is extremely tempting, and it is one of the last frontiers that as a chef I have not yet gone to.  So, on my last trip to Miami (which was exactly 3 days ago) I was looking through the cookbook aisle in Borders and voila!  "The Bread Baker's Apprentice" caught my eye!  The book was covered in plastic wrap so there was no way I could leaf through it like I do most of the time.  But it has several awards on the front, so I figured, this is gonna be good.
This is actually like a frickin space rocket manual.  The first three chapters are all about times, weights, poolish vs. regular breads (??? right?) and so on and so forth.  If I can't make amazing bread at home with this book, then my friends, I am truly doomed.  But if it works, then I am really excited!  There are recipes on how to make bagels, english muffins, rye, sourdough, panettone even!  All of these breads that you cannot, and probably never will be able to, purchase here in Spain.  I chalk it down to the fact that they just aren't a bread culture.
Today I have decided to make Casatiello bread.  This choice comes after browsing through the book briefly, for two specific reasons.  1. It is one of the only breads that doesn't take 2-3 days to make, and 2. The description : This is a rich, dreamy Italian elaboration of brioche, loaded with flavor bursts in the form of cheese and bits of meat, preferably salami.
OK.........Yum.  I mean, who doesn't like brioche with cheese and salami?  (VEGANS...I know, but I am not one of them and will NEVER be one.  Or friends with one.  Sorry, I am sure  you are all incredible people, but if I can't cook for you.....you know the answer.)
So, up to this point is has been surprisingly easy.  That is because I have a stand up mixer, and have kneaded all the dough with it.  I am not going to do all this by hand, I did that in culinary school and I have had enough of that, thank you.  It has taken me most of the morning, but I have been really focused and happy.  At one point I did get really scared because my mixer was traveling all over my counter top....which means it isn't a "professional" mixer even though it says it is......mental note: need a new mixer if I continue to bake bread.  But, the instructions are so clear and so detailed, that I have never had a recipe work so flawlessly.  Now, my bread is in the oven, and that will be a true test to the validity of the book.  Will let ya know in about 40 minutes.
14:39-  Oh my God....I wish I could post smells cause this is ridiculous.  I can't wait.
14:55-  Bread has come out of the oven.  So far so good, except that I can't cut it for another hour.  Maybe I'll just wait thirty minutes for the sake of posterity.
15:22-  I CANNOT BELIEVE I BAKED THIS BREAD.  It is that amazing.  So, that means if you follow the recipe below, you too, on a lazy Sunday afternoon or whenever tickles your fancy, can make this unbelievably buttery, flaky, crusty, lip smacking bread.  Do it, seriously.

Recipe:
Makes 1 large loaf or 2 small ones

Sponge
1/2 cup unbleached bread flour
1 tbsp instant yeast
1 cup whole milk or buttermilk, lukewarm (90 - 100 F)

Dough
4 ounces dry-cured salami or other meat (bacon if you wish)
3 1/2 cups unbleached bread flour
1 tsp salt
1 tbsp granulated sugar
2 large eggs, slightly beaten
3/4 cup unsalted butter, at room temp. (6 oz)
3/4 cup coarsely shredded or grated provolone (or Gouda, Swiss, cheddar)

1. To make the sponge, stir together the flour and the yeast in a bowl.  Whisk in the milk to make a pancake like batter.  Cover with plastic wrap and ferment at room temperature for 1 hour.  The sponge will foam and bubble and should collapse when you tap the bowl.

2. While the sponge is fermenting, dice the salami into small cubes and saute it lightly in a frying pan to crisp it slightly. (Or cook and crumble the bacon or saute fresh sausage or salami substitutes until crisp, saving the rendered fat.)
3. To make the dough, in the bowl of an electric mixer, stir together the flour, salt and sugar with a spoon.  Add the eggs and the sponge and mix with a paddle attachment on low speed until all the ingredients form a course ball.  If there is any loose flour, dribble in a small amount of water or milk to gather it into the dough.  Mix for about 1 minute, then let the dough rest for 10 minutes to allow the gluten to develop.  Divide the butter into 4 pieces.  Begin working the butter into the dough, one piece at a time, mixing on medium speed.  The dough will be soft but not a batter.  Continue mixing for 4 minutes, then switch to a paddle attachment and mix 8 minutes more.  The dough will change from sticky to tacky and eventually come off the sides of the bowl.  If not, sprinkle in more flour until the dough forms a ball and clears the side of a bowl.


4. When dough is smooth, add the meat pieces and mix until they are evenly distributed.  Then gently mix in the cheese until it too is evenly distributed.  The dough will be soft and stretchy, very tacky but not sticky.  If it is sticky, sprinkle in more flour until it firms up.  Lightly oil a large bowl and transfer the dough to the bowl, rolling it around to coat it with oil.  Cover the bowl with plastic wrap.
5. Ferment at room temperature for about 90 minutes, or until the dough increases in size by at least 1 1/2 times.
6. Remove the dough from the bowl and leave as 1 piece for 1 large loaf or divide into 2 pieces for smaller loaves.  Mist the inside

of your pan or pans with spray oil.  Lightly dust your hands with the flour and shape into 1 or 2 loaves and place in pans.  Mist the top of the dough with spray oil and loosely cover the pans with plastic wrap.
7. Proof for 60-90 minutes, or until the dough just crests to the top of the pans.
8. Preheat the oven to 350 F, setting the oven rack in the lower third of the oven.
9. Place the pans with the dough in the oven and bake for 20 minutes, then rotate 180 degrees.  Bake for an additional 20-30 minutes.
10. When the bread is done, remove it from the oven and transfer to a cooling rack.  Take it out of

 the pan and let it cool for another hour before serving or slicing.

Thursday, July 15, 2010

Cinnamon Buns

Ahhhh....cinnamon buns.  It is one of those amazing things, that I truly truly miss about the U.S.A.  The wafting smells of hot cinnamon, the gooey glaze dripping down your hands and off your lips, sooo good.  I always remember being crazily drawn to the smell, as if I was in one of those cartoons where you see the aroma wafting and the character starts floating, eyes half closed towards the origin of said aroma.  But alas, like being shocked into a very bad nightmare, you bite into the cinnamon bun and it isn't what you imagined it to be.  It is surprisingly hard around the edges, having been baked hours or days before, only to be re-heated in that abomination of an invention that we refer to as a Microwave.  Oh, how deceptive it can be, how unfair life is at times. 
Soooo......I like to make them at home.  Nothing, I mean nothing smells better in your kitchen than cinnamon buns baking in your oven, giving your house that unmistakeable cinnamony smell that no candle from Bath and Body Works can replicate.  The recipe that I use, has mashed potatoes, giving it that extra oomph of fluffiness that any cinnamon bun conisseur appreciates, and my brown sugar cinnamon glaze with extra butter, yes, extra butter my friends, makes it gooey-liscious!

So, without further ado, I give you all, dear readers, my "Make-your-house-smell-divine-and-burn-the-roof-of-your-mouth-because-you-really-can't-wait-ten-minutes" recipe for cinnamon buns:

1 cup milk
1/2 cup sugar
2 tsp salt
1 package dry yeast (1/4 oz. or 7g)
2 eggs, lightly beaten
1 cup mashed potatoes (about 3 small)
5 1/2 cups flour (approximately)
1 3/4 cups unsalted butter (440g)
2 1/2 cups packed dark brown sugar
2 tsp ground cinnamon
1 1/2 cups chopped walnuts or pecans

Scald the milk, cool to lukewarm and pour into a large bowl.  Stir in the sugar, salt and yeast.  Let stand for 2 minutes.  Beat in the eggs, mashed potatoes and 1 1/2 cups of flour until just mixed (don't overmix) and leave it for 10 minutes.
Meanwhile, melt 1/2 cup butter (125g) and let cool to lukewarm.
Add the melted butter to the yeast mixture.  Stir in the remaining flour, 1 cup at a time, until smooth and not sticky.  Tramsfer the dough to a floured surface and knead for 2 minutes, adding more flour if needed.  Transfer to a greased bowl, turning to coat, and cover and let rise in a warm place until tripled in volume, about 2 hours.
Melt another 1/2 cup of butter in a small saucepan.  Divide the dough in half and roll each half into a rectangle 5mm thich (1/4 inch).  Brush with the melted butter.  Combine 1/2 cup of the brown sugar with the cinnamon and sprinkle over the dough.  Roll up like a jelly roll, and slice into 1 inch thick rounds, you should get about 9 per roll.  Melt the remaining 3/4 cups butter with the remaining 2 cups brown sugar in a saucepan over medium heat.  Stir until sugar is dissolved, about 5 minutes.  Pour the mix in a large baking dish, and sprinkle with your chopped nuts.  Place the rolls, flat side down on top of the nuts.  Cover with a flour rubbed dishtowel and let sit for another hour. 
Preheat your oven to 350 F (180C).  Bake the rolls until golden brown, about 25 minutes.  When done, cover with a serving platter and invert.  Carefully remove pan, so the caramel runs down over the rolls.

Voila.  Don't eat them all at once.  Save one for breakfast.

Thursday, June 3, 2010

Chocolate date cake with sticky chocolate toffee and crunchy salted almonds

My boyfriend just returned from a "business" trip to Morocco.   One of the presents that he brought back was Medjool Dates.  I loooooove dates.  I think they are extremely succulent, sweet and just sultry and makes me feel like I am in a market filled with exotic spices and sounds every time I bite into one.   Since I had a enormous amount of dates to consume, I wondered, what can I make with them?  Well, I picked up an old Martha Stewart magazine out of my pile, and funny enough the "Dessert of the month" was this chocolate date cake.

I decided to give it a try, because the earthiness of the dates sounds like a great partner to one of my favorite ingredients, chocolate.  Of course, I tweaked it a little to my style, considering that my father is of Arab descent, I thought, what better way to pair dates and chocolate than with nuts?  So, in the cake batter I added some slivered almonds, instead of brandy for the date puree I used sweet Marsala wine ( a nod to my Italian heritage) instead of brandy, and in the toffee I used hazelnut liqueur instead of brandy, once again. For the topping apart from the toffee and dates, I added some crunchy toasted salted marcona almonds, (nod to Spain, my current country) cause I looove sweet and salty together! I like the taste of nuts, and the woodiness it brings forth in the dishes, but I know some of you may be allergic or even just plain not like them, so its up to you whether you would like to include them or not.  So, here I give you my tweaked recipe, and if you don't want the nuts, just omit them and use the regular brandy instead of hazelnut liqueur.

The finished product is so simply delicious and sexy......I suggest you eat it with some nice Moroccan mint tea, or as a ending to a hot, sultry evening!

Enjoy!!!

Chocolate date cake with sticky chocolate toffee and crunchy salted Marcona almonds
Serves 10-12

For the cake:

1 1/4 cups water
22 pitted medjool dates, plus 4 more for garnish
3 tbsp sweet Marsala wine (or brandy)
2 tbsp strong brewed coffee
4 tbsp good quality cocoa powder (unsweetened)
2 cups all purpose flour
1 tsp salt
Pinch of ground cinnamon
12 tbsp unsalted butter, room temp. plus more for pan
3/4 cup dark brown sugar
4 large eggs
1 1/2 tsp baking soda
5 oz. bittersweet chocolate (preferably 61% cacao), finely chopped
1/4 cup almonds, slivered (non salted)

For the glaze

4 tbsp unsalted butter
2/3 cups light brown sugar
1/3 cup corn syrup ( light or dark- I prefer dark)
1 tbsp water
Pinch of salt
2 tbsp heavy cream
4 oz. bittersweet or milk chocolate, chopped
1 tbsp plus 1 1/2 tsp hazelnut liqueur
1/4 cup toasted and salted Marcona almonds, coarsely chopped


1. For the cake: preheat oven to 350 deg. F. Butter 9x3 inch cake pan, line with parchment, and butter parchment. 
2.  Combine water, dates, Marsala, coffee and 2 tbsp of cocoa powder and bring to a boil.  Take off heat, and let cool.  Puree cooled date mixture in a food processor or with an immersion blender.  Place 3/4 cup puree in a small bowl, and press plastic wrap directly on surface; reserve.  Place remaining puree in a large bowl.
3. Whisk flour, salt, cinnamon, and remaining 2 tbsp cocoa in a bowl. 
4. Beat butter and brown sugar with a mixer on medium speed until fluffy.  Add eggs, one at a time, beating after each addition (batter will look curdled).
5. Stir baking soda into date puree.  On low speed, beat flour mixture into egg mixture in 2 additions, alternating with the date mixture.  Beat in chocolate.  Mix in slivered almonds.  Transfer batter to prepared pan, smooth top.
6.  Bake until toothpick inserted into center of cake comes out clean, about 1 hour.  Let cool in pan on top of a wire rack for 30 minutes.  Run a knife around the edge of pan to loosen, and invert cake onto rack.  Remove parchment, turn cake right side up, and let cool completely.  (cake can be wrapped in plastic and stored at room temp for up to 2 days.)
7.  Make the glaze:  Bring butter, brown sugar, corn syrup, water and salt to a boil in a saucepan over medium low heat, stirring occasionally.  Boil 3 minutes.  Remove from heat and whisk in cream, then hazelnut liqueur.  Add chocolate, whisk until smooth.  Let cool until thickened, about 15-20 minutes.
8. Assemble the cake:  Using a serrated knife (or my handy dandy little trick, non minted dental floss to cut the top of cake, just cut a tiny piece at one end, insert the floss tightly wound in your fingers, and drag it across the top of the cake and slice the top off!) trim the rounded top off so it is flat.  Spread remaining date puree on top, then pour the glaze over top, letting some drip off the sides.  Garnish with halved dates and salted toasted Marcona almonds.

Thursday, May 27, 2010

Cranberry Almod Biscotti

I love biscotti.  I think I love them so much because it was one of the first things I learnt how to cook.  In my beginners days, I remember toiling over my mother's Time-Life recipe book collection, which has a book on each category of food, i.e, sauces, meats, cookies, etc.  So, when I figured out that I could actually make something in the kitchen that wouldn't immediately be thrown in the dog bowl, I started trying every recipe I could tackle. 
See, I remember in my high school days, when we lived in Lugano, Switzerland, we were always given a biscotti with our coffee.  The reason, if you don't know or aren't familiar with it, is that this particular cookie has to be dunked in a liquid, for you to be able to bite it without breaking a molar.  In Italy, it's name means twice cooked, and hence its crunchiness.  Also, there it is usually served with Vin Santo, a fruity Tuscan dessert wine, or some other type of liqueur.  Most countries now serve it with coffee, as in Switzerland.

My boyfriend is cuckoo for biscotti, so tonight I decided to make a home-made version.  This is from one of my mother's books, which I copied a while ago into my notebook, and I will kindly share with you because they keep a week in an airtight container, if you don't finish them that evening.*

* They are highly addictive to munch in front of the telly.

To make about 3 dozen

1 3/4 cups dried cranberries
1/2 cup frangelico, or amaretto plus more if needed
3 cups all purpose flour, plus more for your work surface
2 tsp baking powder
1/2 tsp salt
4 tbs unsalted butter, softened
1 cup sugar
4 eggs, 3 whole and 1 egg white lightly beaten
2 tsps vanilla extract
3/4 cups whole blanched almonds (unsalted) chopped
3 tbsp sanding sugar

Preheat oven to 325 degrees F, heat cranberries and liqueur in a small saucepan over low heat, for 8 minutes or until cranberries are softened.  Drain, reserving 2 tbsp of liquid, but if you don't have any left add more liqueur to equal 2 tbsp.

Sift together flour, baking powder and salt in a bowl, set aside.  Put the butter and sugar in the bowl of a mixer, fitted with the paddle attachment.  Mix on medium speed until fluffy, about 2 minutes.  Mix in 3 whole eggs, one at a time.  Mix in the liqueur and vanilla.  Reduce speed to low, and add flour slowly.  Stir in cranberries and almonds.

On a floured surface, halve dough, and place on your baking sheet on parchment paper, or over a silpat, and flatten into two long logs.  Brush logs with beaten egg white, and sprinkle with sanding sugar.

Bake for 35 minutes, rotating the sheet halfway through.  Transfer to a wire rack to cool for about 20 minutes, and lower heat to 300 F.

Cut logs on the diagonal into 16 to 18 pieces, transferring to the racks on their sides.  Set racks on the baking sheet, and bake for 8 minutes, flip, bake another 8 minutes.  Let cool until crisp, and they can be stored in an airtight container for up to a week.

ENJOY!!!!

Saturday, April 24, 2010

Pizza Night!

Who doesn't love pizza?  In Italy, pizza night is usually Sunday night, after la "Mamma" has cooked for you all week, and Lord, does she need a break!  But, pizza is consumed world-wide, on every continent, with its toppings to match.  Case in point, a general (non-official poll done via Facebook by moi) my friends in the states, consume pepperoni or sausage and pepper pizza.  In Colombia, they seem to love pineapple and raisins.  Here in Spain, there is this abominable pizza called the bolognese, with full on spaghetti sauce on.  So, my point being, is that this amazing round of flat bread, can hold many, many toppings according to likes, cultures and tastes.

Anyhow, pizza nights come hand in hand with sports.  It is a fairly easy and crowd pleasing food when you have to have many people over, or even if it is just two or one at home.  But, Monday night Football in the USA usually has pizza (or wings), and Champions League in Europe, also has Pizza.

So, last night was the Iternazionale Milan vs. FC Barcelona Match.  Well awaited, and I also have to say, incredibly underrated.  Since FC Barcelona has been having such spectacular matches lately, thanks to our star "Messi, Messi, Messi, Messi........."  I think that most people thought it was an easy win.  Well it wasn't.  But, hey, we ate fabulous pizza at my house. 
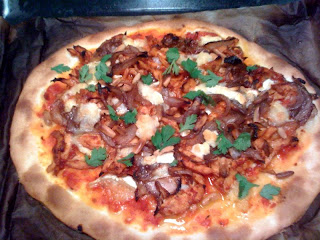
I remember, a very long time ago, sans child, sans culinary degree, that I used to have this pizza at a local place in Miami, which served this amazing, non-Italian-topping pizza.  I fell in love with it.   Well, even though I am a stickler for the rules in what encompasses Italian cuisine, this one really,  really tickled my fancy.  So, I recreated it at home, and I will share with all of my lovely friends and family.


BBQ CHICKEN AND CARAMELIZED RED ONION WITH GOAT CHEESE, PINE  NUTS AND FRESH CORIANDER PIZZA

1 Italian pizza base
1/4 cup classic tomato sauce (recipe follows)
1/2 cup bbq chicken (recipe follows)
1/8 cup caramelized red onions (recipe follows)
1/4 cup goat cheese
1 tbsp toasted pine nuts
1 tsp fresh coriander

Roll out your pizza base, and put your oven to the directed instructions on your oven pan.  Ladle the 1/4 cup classic tomato sauce onto the pizza base, and spread it evenly in a very thin layer.  Spread half of the goat cheese onto the pizza.  Then place the bbq chicken evenly onto the base, followed by the caramelized onions, the remaining goat cheese and toasted pine nuts.  Bake in oven according to your pizza base instructions, usually 10-15 minutes.  When its done, sprinkle your fresh coriander leaves on top. Enjoy!!!

Classic tomato sauce:
2 tbsp. olive oil
1/4 yellow onion, finely chopped
2 garlic cloves, finely chopped
Dash of red chili flakes
1/ tsp. dried oregano, or 1/4 tsp fresh
1 tsp salt
1 14 oz can of peeled crushed tomatoes

In a med frying pan over low heat, add olive oil.  When slightly hot, add the onion, and saute for 10 minutes or until translucent.  Add garlic and saute until fragrant, approx 2 mins.  Add your chili flakes, oregano, and salt.  Now add your tomato sauce, and raise the heat to medium, and cook for 15-20 minutes, or until chunky. Yields 1 - 1/2 cup tomato sauce.

BBQ chicken - sauce and chicken recipe

My homemade barbecue sauce-

1/4 cup yellow onion, finely chopped
3 garlic cloves, finely chopped
2 tbsp olive oil
1/2 tsp cumin powder
1/2 tsp red chili flakes
1/4 tsp dry yellow mustard
1 cup tomato sauce
1/4 cup brown sugar
1/2 tsp soy sauce
1/2 tsp worcestershire sauce
1 tbsp molasses
1/2 tbsp honey
2 tbsp white distilled vinegar, or cider vinegar

In small saucepan, heat oil over low heat, add onions, cumin, chili and mustard powder, and sweat for about 10 minutes.  Add garlic, and cook for at least 2 minutes, or until fragrant.  Add tomato sauce and remaining ingredients and stir, raise heat to medium and cook for 20-25 minutes.  Take off heat and reserve.  Yields 1-1/2 cups.

Balsamic and brown sugar caramelized onions-

2 tbsp. olive oil
1/4 cup water
1 red onion, sliced lengthwise
1 tsp salt
1 tbsp balsamic vinegar
1 tbsp brown sugar

Place all ingredients in frying pan, cook over medium heat, covered for 10 minutes, check to see if it doesn't burn, last five minutes uncover and stir until golden brown.
Reserve.

Chicken-
In the same pan where you cooked the onions, place one tsp of oil, and heat over high heat.  When hot, add boneless skinless chicken fillets, and cook, turning once after 2-3 minutes, until just done.  Take off heat, and wait until completely cooled.  Shred and add 1/ cup bbq sauce.

Monday, March 15, 2010

Recommended Route: Tarragona - Aragon. Pt. 1

Hello my lovely foodies, yes, I have been away for quite a while.  February has been a crazy month, what with wild weather, good friends going away parties and just the winter blahs making my days a little wilder than usual.  But amidst all this madness, my boyfriend and I decided to venture to another region in Spain, for a gastronomic, cultural and relaxing get-away.

The trip was planned around a gift that we received for Christmas, a one night stay in a hotel in Mora de Rubielos, in the outskirts of Teruel.  Since the trip was a four hour drive from Barcelona, we divided it into two sections.  The first night we made a stop in Tortosa, which is south of here, and it has a lovely Parador (government selected national monument, which has been turned into a hotel) where we decided to spend the night.  Since we always love a good restaurant reccomendation, we chose a colleague who enjoys food as much as we do to guide us in those murky waters far from our comfort zone.  He suggested we make a 15 minute drive to a town called Xerta, where there was a restaurant which had recently (2010) been given a Michelin star. 

After we dropped our bags off at our castle turned lodging for the night, we made our way to our destination with our stomachs empty, and I mean really empty, and our expectations high.  When we finally arrived at our little town, I was somewhat amused by its, well, smallness.  I mean, even the roads were small, so small that the car wouldn't fit in the road, and we had to drive it a la Starsky and Hutch with two wheels on the sidewalk.  It's incredible that we got lost, because when I say this is a one horse town, I mean it literally.  We could not find our restaurant, Villa Retiro, and stopped some teenage girls to give us directions.  They knew of the place, but told us, "Oooh, that is really far away!"  She gave us the directions, and a minute later, after turning down a side street about 20 meters away........ Voila!  There she was.  This large outcrop of a building in the middle of nowhere with dubious architectural style.  It was reminiscent of a scene out of Lost.....all of a sudden we were surrounded by tropical foliage, banyan trees, green iridescent lighting illuminating this pseudo colonial manse, with a large garden, pool and terraces straight out of Gaudi's Park Guell....All of this in the Ebro River Delta in northern Spain?!?  I felt like I had somehow entered the Twilight Zone.  But hey, I love these types of evenings, when nothing ceases to amaze you.

The restaurant itself is quite plain, what you would imagine an outdated seafood restaurant to look like. We were escorted upstairs to this blah dining room with a large tank of live lobsters at the back.  I was suddenly feeling a bit uneasy about the whole experiment.....if the food mirrors the environment, we were surely doomed.  But, the minute the Maitre came over to the table, my fears were immidiately dispelled, and I settled down for a lovely night, with my 2nd favorite person (1st being my daughter, of course) and let the magic happen.  We perused the menu, and my first impression was.....I want everything.  That happens to me often, so often that it happend to me last night, but alas, you will have to wait for another blog to find out!

I decided to go the Full Monty.  There was one dish that caught my eye, and my boyfriend's, but I remained adamant that it was to be mine.  And it was.  But, let me go in order.  We chose not to have the tasting menu, instead opting for an appetizer, main and dessert.  We were told that we had to order the dessert in advance, since the kitchen made them to order.  This is great for the restaurant, because they have a guarantee that you will have dessert, even if you are full.  But as I said, our eyes are bigger than our stomachs ( I really wish I could beleive that but for posterity's sake I will add this) and we would order anything.

So, on to the food.  We were first offered two mini bites:

One was a chicken and foi gras canneloni, with bechamel and black truffles.  This was spectacular, vey light, despite the richness of the ingredients.  It definately left me wanting more.


I really can't say the same about the second taste item.  It was goat cheese and apricot covered with sesame seeds, with an edible almond flower and placed over balsamic vinegar glaze.  When she explained this to us, I thought....there are too many ingredients to this whole dish.  But, unfortunately that wasn't the only thing wrong with it.  The sesame seed completely cancelled out any other taste that the dish had.   And I have to say that it would have probably been the same without them, because instead the balsamic glaze would have cancelled anything out. 
Now, please excuse the quality of the photo, but this is my starter.  The name is ESMORZAR DE RIC- which translates to Rich man's lunch.  Yes, they meant it literally.  Wait for it.....Creamed potatoes, with caramelized artichoke, sauteed foie gras, a fried duck egg, all topped with freshly shaved black truffles.  This is just, too good for words.  The only way to eat this is to cut it all up and mix it together.  The egg yolk, mixed with the foie and the truffles......oh, it is orgasmic.  My boyfriend's starter was delicious as well, although it had a softer, smoother quality to it.  If mine was the rich man's lunch, his was the noblity's lunch.  Kind of like new money vs. old money.

This is his starter, a gorgeous brothy rice with fresh lobster (maine lobster, but obviously not from maine.)  It was perfectly cooked, the rice and the lobster, in this divine broth made from crustaceans.  I think that this is a dish that its subtleties made it more enjoyable with every bite.
On to our mains.  By this time, to tell you the truth, I am quite full.  Nothing like a plate of cholesterol to take your hunger away.  But, we ordered fish as our mains, so it wasn't that bad.  I do have to say that I wasn't very impressed with my fish though.......... it was a bit of the same thing with the initial cheese tasting plate.  I think there were too many components.  It was a poached sole, stuffed with mint butter, with a caper cream sauce and fresh peas and bacon, topped with roast red pepper.  Honestly, it was cooked to perfection, but it was too much.  The mint butter was so cold it really made a noticeable contrast with the rest of the dish, and it wasn't harmonious.  I think that it would have been just perfect with just the caper cream sauce and the fresh peas.  I found the mint butter, bacon and peppers to be extraneous.  
Now this is my dessert.  It was called DELICIAS DE PLATANO, or, banana delicacies.  It was fantastic!!  It was a surprise in every bite.  The layers were, brandy flambeed banana, topped with nougat ice cream, with brownie chunks, whipped cream, chocolate pop rocks, and fried sweetened plaintains on top.  Look at this!  It was soooo much fun to eat, and delicious too!  The only thing I can complain about is, that outside of the U.S., they don't know how to make brownies.  They are always dry.  But everything else was a success!
I think that this little restaurant is a gem.  If you are anywhere near Tortosa, or fancy making a day trip or a night out of it, stop here.  You won't be disappointed.  My next blog will be about our dinner in Mora de Rubielos.  A 100% Black Truffle Tasting Menu.  YUM.MY.


Carrer del Molins, 2
43592 Xerta (Tarragona)
977 473 810


Wednesday, February 3, 2010

Barcelona's best: Can Pineda

I've been to Can Pineda twice.  Even so, I still can't tell you how to get there.  It is tucked away in one of Barcelona's least popular "barrios" (areas), and even the directions given to taxi drivers illicit blank stares.  When you arrive there, you question yourself again.....uh oh, did I make a mistake coming here?  The decoration is, how should I put it? Kitschy, to be nice.  The wooden tables and chairs look like the ones your italian friends' grandmother had in her kitchen, and the walls are fully tiled in, oooh, let's see......a yellowish brown hue that can best be described as what you find in your baby's diaper.  Then all the plates and old pictures also remind you of "Luigi's" grandmothers house again.  Anyhow, you sit down, read the menu, and everything starts to feel alright......because in this little non descript place, magic happens.

Last night, we made the pilgrimage to Can Pineda.  Two of us having been there, and two virgins.....Emmanuel whom has been to several restaurants with me and always expects the best, and my other friend, Fernando, who is also one of the worlds biggest food lovers and critics.  It took us a good 10 minutes to decide what we wanted to eat, not because we were unsure of what was on the menu, it was because suddenly we all became 5 year olds at a candy shop.  Hardly containing our excitement, we wanted to order everything.  Emmanuel, knowing not a stitch of spanish, let the recently converted children choose the menu....and he was very, very happy indeed. 

Of course, we ordered a bottle of Enate Sotomontano Merlot, from Fernando's beloved region of Aragon.  Then out comes the plate of pan con tomate, tomato bread, which was eaten almost in its entirety by Emmanuel.  Then another plate of bread with Iberian Ham.  I usually don't gush about ham in my blogs because it is kind of a staple here, but this one deserves a mention.  The hue of the ham was darker than I am used to, with large edges of fat.  I was dubious of its quality at first, but as I sampled the first bite, those doubts all fled immidiately from my mind.  Umami.  That is the only way I can describe the sensory sensation that can best describe this ham.  It just dissolves in your mouth, coating your tongue in this inexplicable feeling of pure joy.  Before we could finish the ham, our second plate was brought out.
Pulpo con papada, Octopus and pork cheeks.  We chose this dish for the unusual combination, and also because it reminded Fernando of his childhood when they celebrated the day of St. Martin, which is when they massacre the pigs here in Spain.  He said that after the massacre, they would extract the pork cheeks, which is the best part, and make sandwhiches.

I have to apologize for the quality of the picture, because in our excitement, we dived straight into this marvel of a dish.  The delicate sweetness of the octupus, balanced out the saltiness of the pork cheek, topped with crunchy thin slices of yuca and drizzled with a balsamic reduction.  The octupus was fork tender, and the pork cheeks just melted in our mouths.  All the flavors balanced each other, it just combined perfectly, no one flavor outdoing the other.


After this came the dish that we ALL agreed we would have, Huevo poche con foie, butiffarra y trufa negra,  Poached egg with foie gras, blood sausage and black truffles.

Do you see the mountain of truffles?  This was, as Emmanuel put it, orgasmic.  The waitress explained that we should cut it all up and mix it together, and she was right.  Every single bite cause us to moan with pleasure.  It was a sensory overload.   Every single plate was left clean, and our intrepid diner, Emmanuel, promptly ordered a second dish.  He stated that basically, he would come back here just for this dish, and we said, well, the place might be booked.  Emmanuel quickly answered, " I don't care, I'll eat this on the sidewalk outside, in the rain, under an umbrella" as he quickly devoured the second one in two seconds.

On to our mains.  We chose three different things.  Paolo chose Entrecote de vaca vieja, Entrecote of old cow,  Fernando and I chose the Oxtail with truffled mashed potatoes, and Emmanuel the Gambas de Palamos, Prawns from Palamos (a city in the Costa Brava).


This is Paolo's Entrecote.  Perfectly cooked, on a sizzling plate of oil and it's juices.  Juicy, tender, moist.  It was perfectly seasoned, and accompanied by roasted red Piquillo peppers.  This plate of aged beef was one of the best that I have tasted in Barcelona.  After Paolo was done, everyone was sopping up the pan juices with bread, and as Emmanuel rightly stated, it should be served with a side of Lipitor.
This was what Fernando and I ordered.  The taste was incredible, but we both agreed that the oxtail was a bit dry.  It was disappointing, because done properly, this had the workings of being something superb.  We also found that they had skimped a bit on the truffles, which I personally think that they had given them all to Emmanuel, who had ordered a side dish of just the potatoes and truffles.  His came with the equivalent of Mt. Everest of truffles on top......oh well, perfect it isn't. 
And here are Emmanuel's prawns.  How can I describe these?  Better than lobster is what comes to mind.  Succulent and sweet, and tasting freshly caught from the sea.  Perfectly grilled and topped with just a smidgen of fleur de sel, you are hard pressed to find prawns like this anywhere else in the world.  Gambas de Palamos are reknowed to be the best,  mainly because every two to three years, they disappear.  This is a natural phenomenon that happens when there are extremely cold winters in Cap de Creus (northern Spain) that provoke underwater "waterfalls" that push the prawns to unfishable depths.  These currents also carry a variety of nutrients that feed the prawns, where they proliferate untouched by fishermen.  Then they slowly make their way back up to the coastal areas, in abundance and we have our Gambas again for a short time.  It is said that in 2011 the prawns will "disappear" again, so I am extremely happy that we were able to eat this bounty from the sea.

Now, on to dessert.  I wish I could say we were too full to order dessert, but you know me better than that.  Also, because at Can Pineda there is a gorgeous dessert called Bombetes.  This translates to little bombs.  It's basically filo pastry filled with cream or chocolate, then deep fried.  The result is an explosion of flavor in your mouth, as the cold liquid tempers the hot pastry in your mouth.  You have to eat them in one bite to get the full effect!
So, today, I don't think I will be able to eat anything until dinner time.  But it was well worth it.  I can't wait to make our "pilgrimage" to Can Pineda again some time, because I am sure that it will only surprise me once again.
If you want a break from your Barcelona nightmare of tourist restaurants, and would like to try excellent traditional Spanish cuisine, come to Can Pineda.  You won't regret it.

Can Pineda
St. Joan de Malta, 55
+ 34 933 083 081